
Mastering the art of the cocktail photo is like mastering the art of the cocktail. Equal parts art, science, magic. There’s no right or wrong. And it always begs the question, “could it be better?” While I am far from a professional cocktail photographer myself, I browse through thousands of photos every month and have gotten a good sense for what works. Not only that, I recently put out a question to the Home Bar Awards Instagram community asking for real tips on shooting cocktails on a budget, and here’s what we’ve come up with!
Editing
In every good photographer’s toolkit is their go-to editing program. It has the power to elevate, but it also has the power to destroy. Even the best photographers in the world edit their photos. But there really is nothing worse than an over-edited photo. And the line between these can be blurry at times. But seriously, go easy on the editing. Stick to adjusting for things like brightness, contrast, and warmth and avoid heavy filters or blurring effects than distort the details and make it hard to get a true sense of the cocktail.
Here are some free mobile apps suggested from the community:
Snapseed
Suggested by: @cocktails_by_tempus, @homebartenderuk
I’m a big fan and user of Snapseed. I especially love how you can easily toggle between the edited and the unedited versions by tap-holding the screen.
VSCO
Suggested by: @onelog
This is a personal favorite of mine. What I love about VSCO is the templates which allow you to maintain a consistent feel to all of your photos on your profile.
Suggested by: @mcnicolmakes
I don’t use this much for editing, but know a lot of people who do. Lauren says to use this especially for brightness (this is a big one for inexperienced shooters), highlights/shadows and sharpness.
Adobe Lightroom
Suggested by: @Davidjapke2.0, @mrmuddle
I’ve only used the desktop version of this app at $9.99/month, but have heard great things about the free mobile version.
Lighting
The most common - and easily fixable - mistake I see in people just getting into cocktail photography is proper lighting. Sure, it’s editable post-shot, but it’s always better to get it right during the shoot (more editing = more compromises on other aspects of the photo). The key to proper lighting is diffusion, as direct lighting is going to give you unwanted glare, reflections and uneven lighting.
Here are some tips from the community:
Desk lamp with baking paper
Suggested by: @clinkclinkdrink
I haven’t tried this one but this is clever, defintely worth a shot!
Mobile phone flashlight with napkin
Suggested by: @t_streetman
Another great scrappy way to diffuse the lighting against your beautiful cocktail.
Light through mattress sheet
Suggested by: @theamateurmixer
People get pretty inventive!
Natural light!!!
Suggested by: @cocktail_chris (that’s me - but it’s certainly not my original idea!)
There is nothing better than natural light! Most of us are just hobbyists which means we have day jobs so this makes it very difficult on work days, but take advantage of your days off and get some shots when you have natural light coming into your living space.
Candle lighting for interesting lighting
Suggested by: @elivnam
I’ve done this one or two times taking photos in dark bars, but have not tried this at home.
Softboxes
Suggested by: @Nickassaur
According to Nick, it’s the best $100 he ever spent. Not exactly “low budget”, but also not going to break the bank.

Staging
Do not underestimate a properly staged photo. There is so much work that goes into a cocktail photo before the cocktail is ever made. Take your time, think it through, even try sketching it out first!
Here are some tips from the community:
cheap backdrops on EBAY, Amazon, Craigslist, etc.
Suggested by: @cocktails_by_tempus, @sekmeister
I’d also add that you can probably find stuff on Facebook Marketplace and Craigslist in the US.
Blackbox
Suggested by: @themixjulep
This is like a shadow box but for placing your cocktails in.
Sketch out your shot
Suggested by: @cocktail_chris
Sometimes it helps to just sketch out the shot on paper to get a sense of how everything works together and fills out the scene.
Contrast
Suggested by: @cocktail_chris
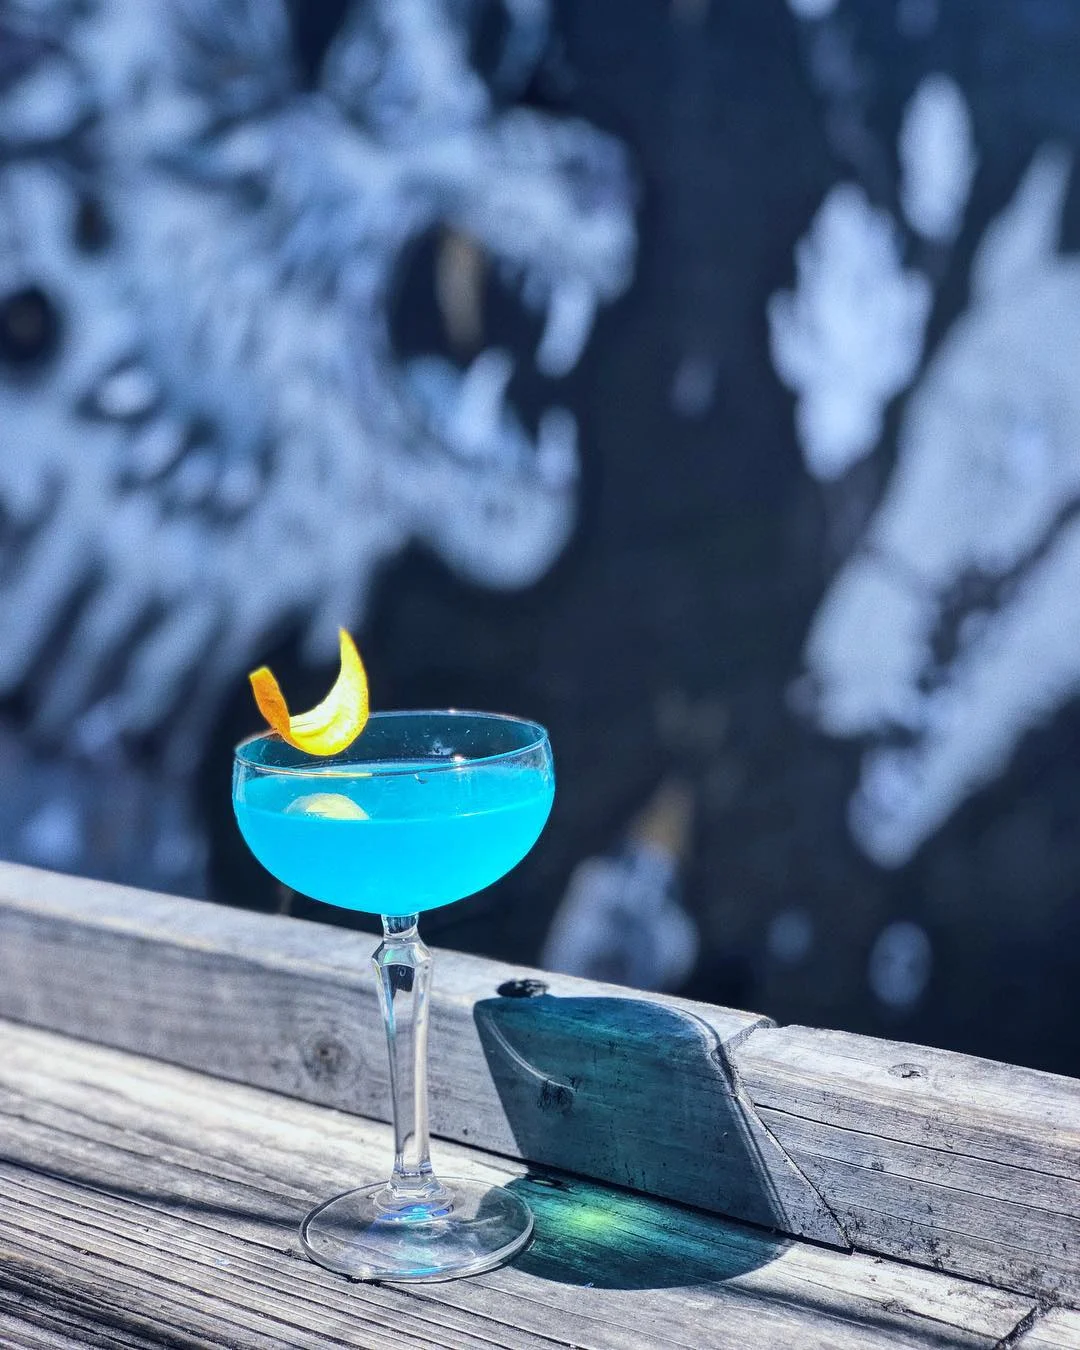
Contrast is a very powerful thing. Almost all of the best cocktail photos I see have one thing in common – contrast. Whether it’s color, texture or a mixture of both, you have about 0.5 seconds to capture the attention of fellow Instagrammers, so make it pop!
Garnish
Suggested by: @cocktail_chris
Speaking of contrast, garnishes can make or break your shot. Ideally, the garnish should be a different color than the drink itself. Don’t get all matchy matchy.
The key to a good garnish is less about the intracy and more about how well it complements the drink and therefore the shot.
Oh, and make sure your garnish is ready to go before you make the drink! There’s nothing worse than spending all that time staging and making your cocktail, only to remember you forgot to cut that perfectly sized orange swath.
Use the freezer to your advantage.
Suggested by: @cocktail_chris
If I know I need ice in my glass before the shot, I’ll actually add the ice before making the drink, put the glass in the freezer and take it out before the serve.
This also will create some nice condensation on the glasses, albeit, only for about 30-60 seconds (pressure’s on!).
Alternatively, for something like a stirred drink, you can make it in advance and store in the freezer momentarily while you build out the finishing touches of your garnish or staging.
Equipment
Tripod
Suggested by @Aginthing_
Even a cheap one for your phone can help, especially if you want to get some action shots and you’re a team of one.

iPhone portrait mode
Suggested by @jkershvt, @kinwhiskey
SERIOUSLY. The #1 best tool I had while building @Socktails_co was iPhone Portrait Mode. It’s a solid option as it mimics the bokeh effect (focused foreground, unfocused background). The technology is ingenius, it actually uses two lenses to get that professional look, but it has its limitations, especially with glassware. I can’t tell you how frustrating it can be to have this beautiful cocktail in front of you quickly getting diluted because portrait mode can’t detect where the glass ends and the background begins. But hey, we’re on a budget right?
Practice
Watch YouTube videos from The Bite Shot and other vloggers
Suggested by: @Wisecraft_mixology
I can’t recommend this one enough. It’s one thing to see the final product on instagram, but understanding what goes through a professional photographer’s mind during a photo shoot is invaluable.
Draw Inspiration From Others
Suggested by: @cocktail_chris
Pay close attention to the shots you like and those you don’t and write these down. Then go and practice this, become an expert!
Suggestions?
Have other suggestions? Email me at chris@homebarawards or DM me on Instagram.